Publish a Universal Binary iOS Framework in Swift using CocoaPods
Oct 18, 2016
CocoaPods is the most popular dependency manager for Swift and Objective-C Cocoa projects, but chances are, you already knew that if you're here, wanting to publish your own CocoaPod to be used by others in their own projects.
Publishing a standard, open-source CocoaPod is relatively straightforward -- lots of tutorials are widely-available that outline the process rather efficiently -- but there lacks a definitive guide on how to publish a universal, binary CocoaPod: one that does not disclose its source files and supports both physical iOS device architectures (armv7, arm64) and virtual iOS simulator architectures (i386, x86_64).
Sometimes, you are simply not at liberty to disclose the source code of a CocoaPod. You might work for a company that develops an SDK which, for competitive reasons, must not be open source. That's when distributing a universal, binary framework is a must.
Install CocoaPods
Obviously, to create a pod, you need to install CocoaPods.
For Xcode 8, you'll need CocoaPods version 1.1.0.rc.3 or newer. If you already have CocoaPods installed (check by running pod --version) and its version is older than the aforementioned version, first uninstall it by running sudo gem uninstall cocoapods.
To install the latest version of CocoaPods, execute the following command:
sudo gem install cocoapods --pre
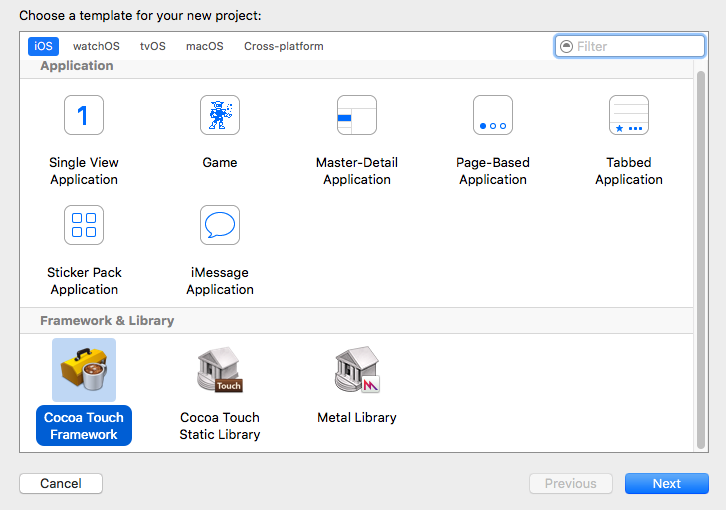
Create a Project
Create a new Xcode project for your framework and select the Cocoa Touch Framework template:
Enter a Product Name and choose Swift as the project language. For the purpose of writing this guide, I've chosen to create a framework called MySDK that exposes a method which simply prints a String to the console.
Feel free to replace this dummy implementation with your own functionality, and replace MySDK with your own framework name whenever mentioned in the rest of this guide.
After Xcode finishes creating the project, feel free to delete the MySDK.h file included in the template, as you won't be needing it.
Develop Functionality
Time to actually write and expose some APIs in your framework.
Create a file called MySDK.swift within the MySDK group, with the following contents:
import Foundation

public class MySDK {
    public class func logToConsole(msg: String) {
        print(msg);
    }
}
Note that you must explicitly label all classes and methods you wish to expose in your framework with the public keyword, otherwise, they won't be accessible in other projects.
Create a Demo Project
To test the framework in action and make sure it works as expected, we'll create a demo iOS app within the framework project that depends on the framework and invokes its method(s).
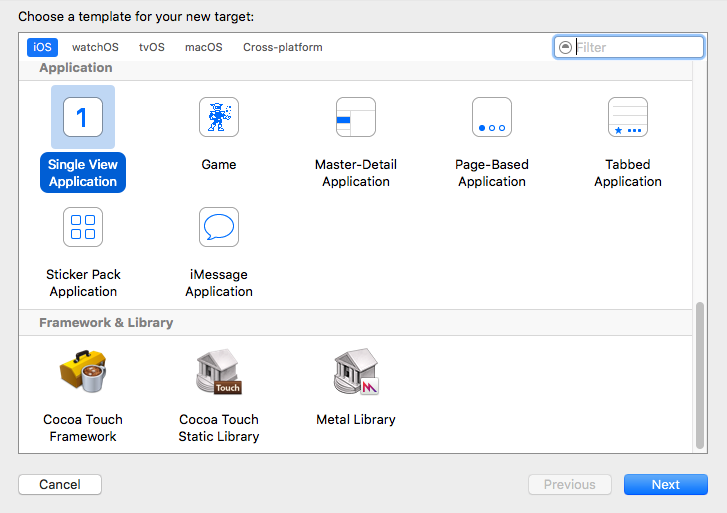
Open the project editor for the MySDK target and click on Editor -> Add Target in the menu bar.
Select Single View Application as the template:
For the product name, enter Demo, and select Swift as the project language.
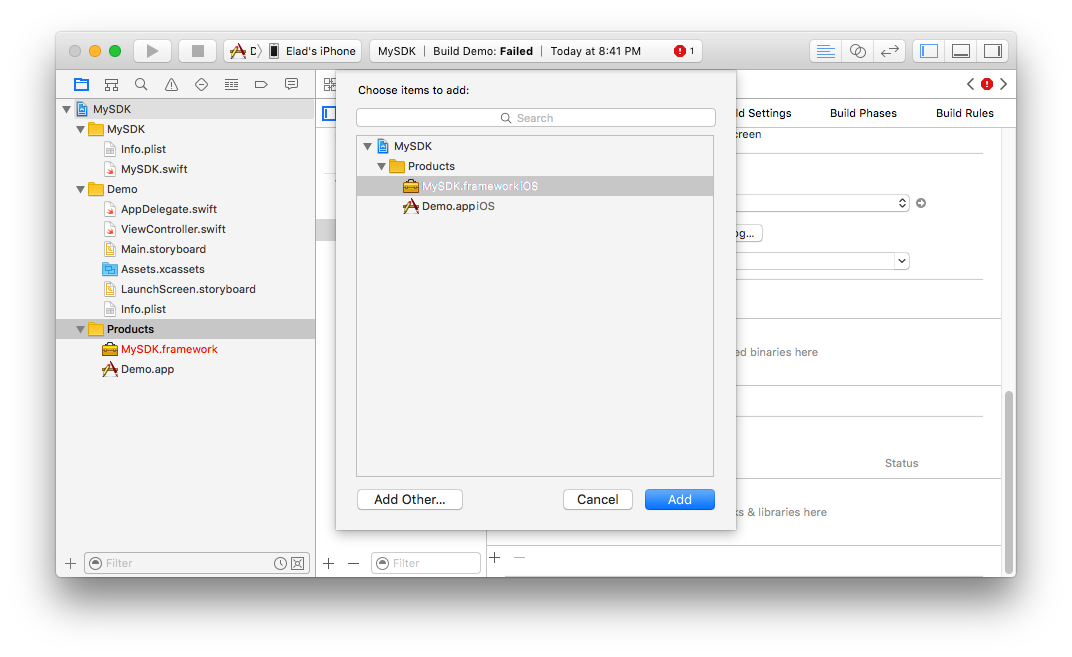
When the demo target is created, navigate to its project editor, scroll down to the Embedded Binaries section, click the + icon, and select MySDK.framework:
Interface with the Framework
Open the demo project's AppDelegate.swift file and import your framework:
import MySDK
In the applicationDidBecomeActive method, add the following code to log that the app is now active:
MySDK.logToConsole(msg: "Application active")
And in the applicationDidEnterBackground method, add a different message:
MySDK.logToConsole(msg: "Application inactive")
Run the demo project on your iOS device or simulator. The Xcode console should print Application active once the app finishes launching.
Press the Home button (Cmd + Shift + H on the iOS Simulator) and the console should print Application inactive.

It appears that the demo project is able to successfully interface with the framework!
Enable Archiving
Cocoa Touch Frameworks, by default, cannot be archived.
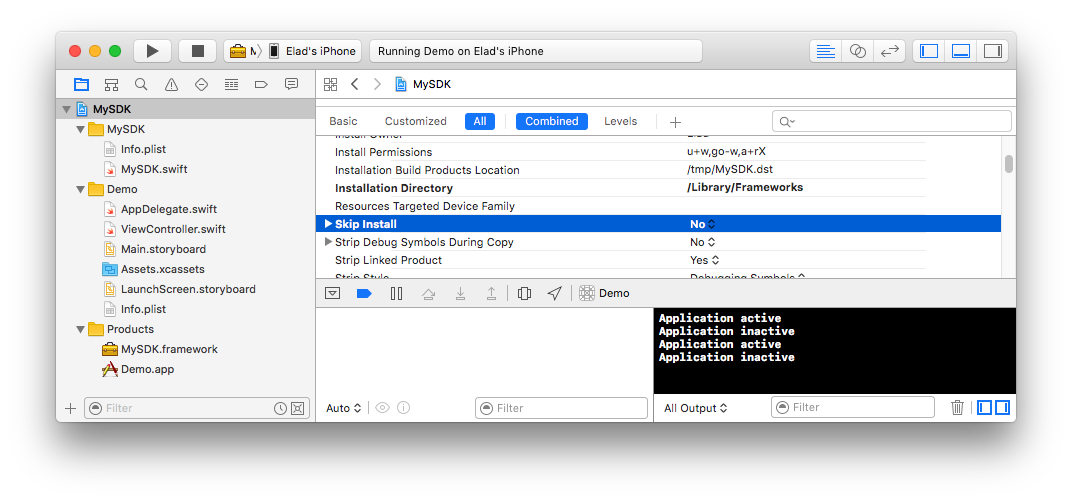
You can enable your framework to be archived by editing the framework target's Build Settings and setting Skip Install to No:
However, if you attempt to archive now, Xcode will only build the armv7 and arm64 executables, which would make it impossible to run the framework on the iOS simulator.
Generate Universal Framework
Due to a bug in Xcode, it is impossible to archive universal frameworks without relying on external scripts. To include binaries for the iOS simulator, you can configure a post-archive script that will build your framework for the iOS simulator after you archive it, and merge both the simulator and iOS binaries into one fat universal framework.
To have Xcode run the script after archiving automatically, select the MySDK target, click Product -> Scheme -> Edit Scheme (or Cmd + Shift + <), and configure a Run Script post-action for the Archive command:
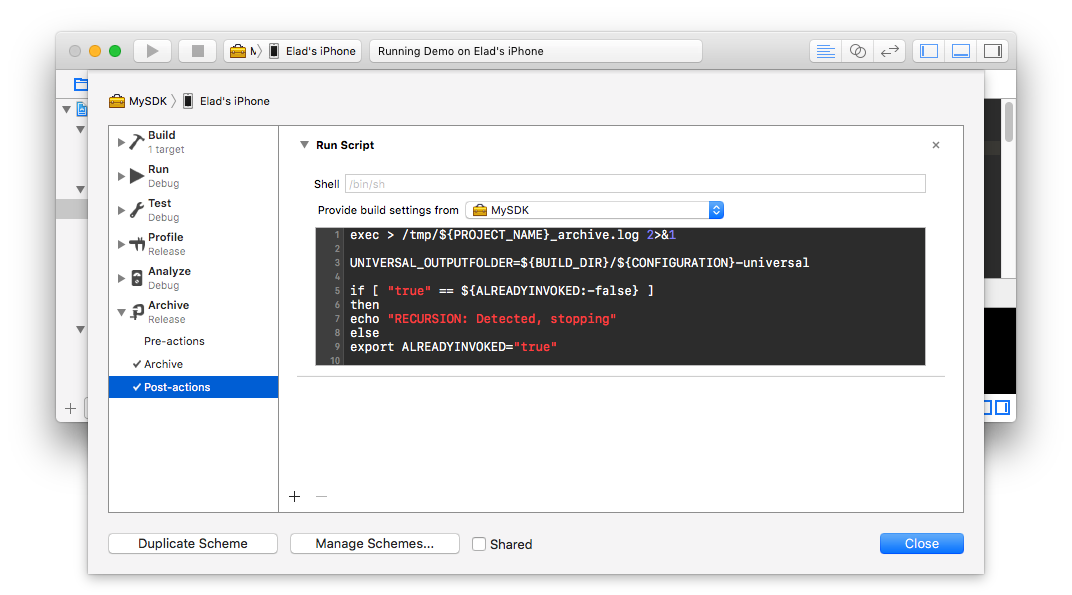
Copy this script and paste it into the Run Script window (thanks to @atsepkov for the original script).
Be sure to select MySDK for the Provide build settings from setting and click Close to apply the changes.
Archive Framework
Finally, archive the framework by clicking Build -> Archive in the menu bar. If the option is greyed out, make sure to select a physical iOS device and not the iOS simulator.
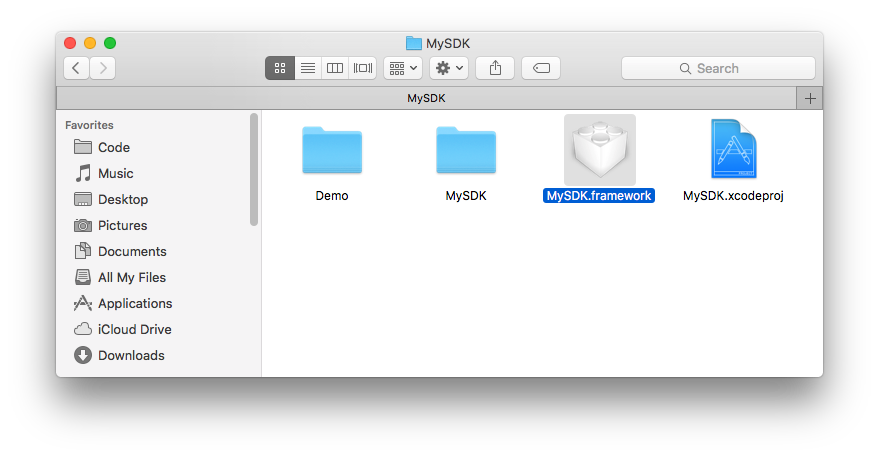
Once the bundle is archived, the Xcode Organizer will pop up. Wait a few more seconds, and the Finder should also open up to your project directory with a universal MySDK.framework inside it.
You can verify that MySDK.framework is indeed a universal framework by running file MySDK within the MySDK.framework directory:
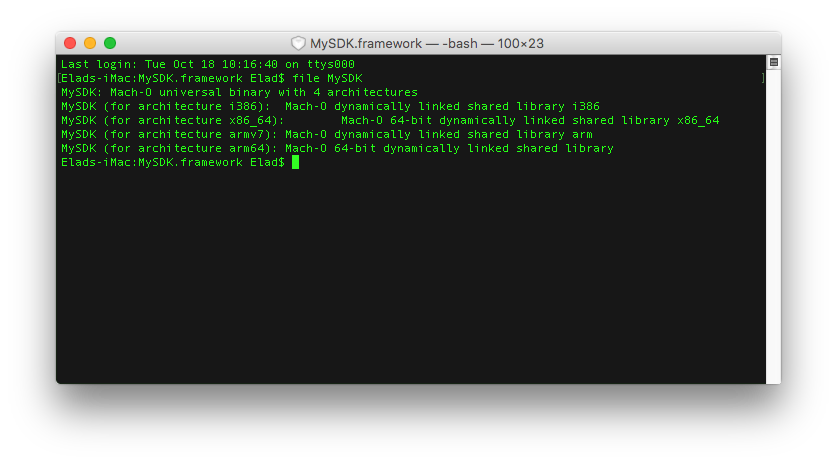
As the output suggests, the executable contains binaries for the i386, x86_64, armv7 and arm64 architectures, which makes it a universal, fat framework.
CocoaPod Specifications
Now that you have successfully exported the universal framework, let's distribute it as a CocoaPod!
Create a MySDK.podspec file in your project directory which will contain information about the CocoaPod you are publishing, such as its name, version, sources, and more.
Paste the following contents inside it:
Pod::Spec.new do |s|
    s.name              = 'MySDK'
    s.version           = '1.0.0'
    s.summary           = 'A really cool SDK that logs stuff.'
    s.homepage          = 'http://example.com/'

    s.author            = { 'Name' => 'sdk@example.com' }
    s.license           = { :type => 'Apache-2.0', :file => 'LICENSE' }

    s.platform          = :ios
    s.source            = { :http => 'http://example.com/sdk/1.0.0/MySDK.zip' }

    s.ios.deployment_target = '8.0'
    s.ios.vendored_frameworks = 'MySDK.framework'
end
Feel free to customize the .podspec to your liking. Here is an explanation for some of the more non-trivial properties:
s.license- you must ship a license file with your CocoaPod, so go ahead and create aLICENSEfile in your project directory with this as its content.s.source- the hosted.ziplocation of your CocoaPod files (in your case, theMySDK.frameworkfolder and theLICENSEfile). More on this later.s.ios.vendored_frameworks- the path of the framework you are distributing within thes.sourcearchive, after being decompressed.
Did you know? When you publish a CocoaPod, the only file that actually gets pushed up to the CocoaPods repository is your .podspec file. Nothing else, which is why you must link to the hosted files via the s.source parameter.
Create a Zip Archive
The easiest way to make your framework and license available with your CocoaPod is to archive them inside a .zip, upload it to your server, and link to it using the s.source parameter in the .podspec file.
Create the MySDK.zip file by running the following command in your project directory:
zip -r MySDK.zip LICENSE MySDK.framework
It's up to you to upload the MySDK.zip file to your server, in a path similar to the following:
http://example.com/sdk/1.0.0/MySDK.zip
You can also create a GitHub repository and push the .zip file to it.
Once you upload the .zip, link to it in the s.source parameter of the .podspec file.
Pre-Publish Testing
Before you publish, you will want to make sure that the CocoaPod .podspec is correctly configured to distribute your framework.
Create a brand new Xcode project and select Single View Application as its template.
Run the following command in the project directory:
pod init
Edit the Podfile and paste the following within the target declaration to reference a CocoaPod dependency from the local filesystem:
pod 'MySDK', :podspec => '/Code/mysdk-pod/'
Modify the :podspec to the local path of the framework project containing the MySDK.podspec file.
Save the file and run the following command to install the CocoaPod:
pod install
Reopen the test project via its newly-generated .xcworkspace file, and attempt to import your framework within the AppDelegate.swift file:
import MySDK
Also, attempt to access the various method(s), such as MySDK.logToConsole. Run the app on an iOS device. If everything worked as expected, you're ready to publish your framework!
Register a Trunk Account
To publish your .podspec file to the CocoaPods repository, you must first register an account with the CocoaPods Trunk.
The CocoaPods Trunk is an authentication and CocoaPods API service. To publish new or updated libraries to CocoaPods for public release, you will need to be registered with the Trunk and have a valid Trunk session on your current device.
Register an account by running the following, entering your full name and e-mail address:
pod trunk register you@email.com 'Full Name'
Then, check your e-mail for a confirmation link and click it.
Your Trunk account is now activated and you can finally publish your CocoaPod!
Publish the Pod
Run the following command in the same directory as the .podspec to publish it to the CocoaPods repository:
pod trunk push MySDK.podspec
The CLI will validate your .podspec and attempt to install the CocoaPod by downloading the source .zip and validating its contents. If the command succeeds, you have just published your first universal binary CocoaPod!
Test Again
Create another test project, run pod init, and add the following to the Podfile:
pod 'MySDK', '1.0.0'
Then, run pod install and cross your fingers.
Reopen the test project's .xcworkspace file and once again, attempt to interface with your framework. Run the app on an iOS device. If everything worked as expected, you should be good to go!
Let me know if this guide helped you in the comments below!